Categories
Development Powershell Tutorials

Powershell – Navigating the cyber sea

If you’re used to navigation in Windows with your cursor or using your fingers on a touch screen, then using a command line interface might be little awkward at first.

In this post we’ll take a look at how you can navigate this dark blue sea of Powershell.

For starters, you’ll probably need to type the same command again during the same session and it would be unnecessary to type all that twice.
Thankfully Powershell has a history of your latest commands and you access them by using the arrow keys (up & down).
Using that you can toggle through your command history and easily reuse them.

Not an actual function or cmdlet, but you could create it!

Next up is a way to clear the screen because sometimes it’s just to much clutter!
This is done with the Clear-Host cmdlet but you’ll probably use the alias ‘cls’.
It doesn’t remove anything you’ve done, it just removes all the text in the Powershell window.

If you’ve already played around a bit with Powershell you would’ve noticed that copying and pasting can be a bit wonky in the shell (depending on Powershell version, newer versions are more logical. ISE works better as well).
Currently I’m running Powershell 5.1.18362.145 ($PSVersionTable to check your version).
In this version of Powershell you can use CTRL+C and CTRL+V for copying and pasting which is excellent.

But this was not always possible.
In earlier builds of Powershell you had to first right click in the console window and click ‘Edit’ > ‘mark’, similar to the image below.

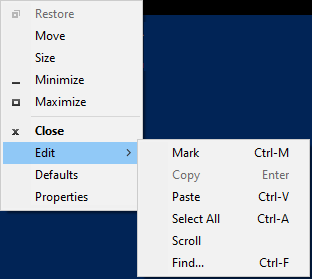
And once you’ve marked what you want to copy, press enter.
In order to paste that line of code you found online, you had to right click, go to ‘Edit’ again and then press ‘Paste’.

Now something you could do was right click on the window frame and go to properties, like I did on the above picture.
Here you can enable something called ‘Quick edit mode’, now this was awesome.

With Quick edit mode enabled marking was as simple as clicking and dragging, just like you’d expect!
And while something is marked you’d only have to right click in order to copy it.
If nothing is marked then by right clicking you’d paste it instead.

In the properties window you can also change settings like font style and size, colors and size of your window.
It also includes settings for the buffer which is how many commands Powershell should save and much more.

As always, continue to learn and evolve your skills, see you in the next one!

Do you want to know more? Here is a list of tutorials to check next

Categories
Development Powershell Tutorials

Powershell – From deeply flawed to very powerful

“Powershell is such a great product because I’m a deeplyflawed human being.” – Jeffrey Snover, the creator of Powershell

Powershell is that friend that you can always rely on. When your memory fails you, Powershell is there to help!

In this post we’ll be talking about some of the features in Powershell that can assist you on your journey.
Lets begin with the Get-Help cmdlet.

Notice that I did not type -Name. That is because the Name parameter has a positional value of 0, which means that the first entered value will be inputted as Name.
More about this in a later post.

Type the cmdlet you want help with after Get-Help and you’ll see the above information.
At the bottom of the image you can see I’ve added -Detailed, and just like it sounds this gives more detailed information about the cmdlet.

The information is also available online, just search after the cmdlet name or what you want to do and you’ll find the Microsoft article.
For example here is the Get-Process article.

The syntax is explained here, I’ll paste the main part below:

<command-name> -<Required Parameter Name> <Required Parameter Value>
[-<Optional Parameter Name> <Optional Parameter Value>]
[-<Optional Switch Parameters>]
[-<Optional Parameter Name>] <Required Parameter Value>

Tab auto completion
Now this is a feature that you’ll be using all the time!
Start to write something, can be cmdlet names, parameters, variable names etc., and then hit tab and Powershell will try to guess what you wanted to type.
For example typing ‘get-pro’ and then hitting the ‘Tab key’ will give you ‘Get-Process’.
You can press tab several times, if what you typed could be resolved to several names than you’ll go through the list.
Pressing ‘Shift + Tab’ will go backwards in the list.

If a cmdlet can’t be auto completed, then either you’ve typed it incorrectly or the cmdlet isn’t loaded.
Now we haven’t started talking about modules and functions yet, but Powershell comes with some cmdlets builtin and then you can add more on top of those. We’ll look at that in a future post.

Intellisense
This is Microsoft’s context-aware code completion feature and it is very useful.
In Powershell ISE you have access to it automatically but if it doesn’t show up, which sometimes happens, you can get it to show by pressing ‘CTRL + Space’.
In the version of Powershell I’m running, Intellisense is also available in the shell (5.1.15063.1805), also by pressing ‘CTRL + Space’.

Intellisense in ISE with cmdlet names.
Intellisense in the shell for parameters.

Play around with these features and get comfortable with them and it will help you going forward!

As always, continue to learn and evolve your skills, see you in the next one!

Do you want to know more? Here is a list of tutorials to check next

Categories
Development Powershell Tutorials

Powershell – But I only want to see this

In this post we will continue to discover basic functionality of Powershell by looking at how we can select what information we wish to display when running a Get-* cmdlet.
We will also touch on how to check what version of Powershell we are running.

Last post I talked a bit about different Powershell versions and you might wonder how you can tell what version of Powershell is running on your machine.
The answer can easily be found in a special Powershell variable called $PSVersionTable.

Open up Powershell (both the shell or ISE is fine) and type in the variable name and hit enter.

PSVersion is the one we are interested in.

Check this link for information on installing different versions of Powershell.

Now, if we instead move on to the main part of this post and to what we actually want to see.

When we used Get-Process to get all processes named ‘calculator’, we were presented with a couple of attributes.

This is fine but you might feel that some of it is a bit abundant.
Again, we have a couple of different ways we can chose what to display and we’ll look at a few of them below.

Alias = Alternative name for a Cmdlet, function or parameter. Often used to shorten how much you need to type.

Format-Table
This cmdlet formats the output in a table structure and displays only the attributes you choose.
However if you do not enter anything after Format-Table it will display all attributes available. In some cases you’ll need to enter the wildcard character * for all attributes to display (depends on the cmdlet).

This cmdlet is used a lot when you want to output a few attributes on the screen.
A good example for when Format-Table is perfect to use would be when you want to check all your Chrome processes and their load on CPU.

Format-Table has a very handy parameter which is called -AutoSize that auto sizes the column width.

Alias: FT (Not case sensitive)

Format-List
Works like Format-Table but displays the output in a list.
Does not have the -AutoSize parameter.

Format-List is also used a lot and comes in handy when you want to display a lot of attributes for one process.

Alias: FL (Not case sensitive)

Select-Object
Now this one is a bit different from the other two and is used more for scripting, but still useful if all you want is to display some information on your screen.

Select-Object will output in either list or table format, based on how many attributes are present.

This cmdlet will be shown many times on this blog and is also easy to play with so try to explore it on your own too!

Some common parameters and their usage:
-First 1
Displays the first object in the list, you can enter any number to display more or less.

-Last 1
Works just like -First but instead displays the last object/objects.

-ExpandProperty Name
Only accepts one property but expands it. We’ll go into more details about this feature further down the line but it basicallys opens up the property you selects. Some properties might include several values so then you’ll see it’s sub properties.
If we take the Name property as an example, when using ‘-ExpandProperty name’ it will display the name only and not the ‘header/title’ above it.

-Unique
Displays only unique values.

Alias: Select

There is more to say about all of these cmdlets and sometimes we only touch lightly on a subject, but don’t worry, we’ll be seing a lot of these in the future!

As always, continue to learn and evolve your skills, see you in the next one!

Do you want to know more? Here is a list of tutorials to check next

Categories
Development Powershell Tutorials

Powershell – Introduction

Powershell logo

“One tool to rule them all”
“Those who don’t automate are doomed to repeat themselves”

Powershell, the command line framework and scripting language from Microsoft.
In the beginning this was a Windows only feature (Windows Powershell) but has since Powershell Core and
Powershell 7 gone to open-source and is available on other platforms.
Since I am a Windows guy we’ll be focusing on Powershell from a Windows perspective.

Windows 10 comes with Windows Powershell 5 preinstalled.
Simply type Powershell into your start menu’s search bar and you’ll see two applications:
Powershell and Powershell ISE (x86 and x64)

Powershell or Powershell.exe is where you write Powershell one line at a time, much like the
Command prompt (CMD) that many has seen before.
The commands used in Powershell is called ‘cmdlets’ and are named like Verb-Noun.

Powershell ISE is the other application which ships with Windows and it has been the primary editor for Powershell scripts.
Microsoft has now stopped developing the ISE and is instead promoting the use of Visual Studio Code (VSC) with a Powershell plugin.
Visual Studio Code is free to download and use. https://code.visualstudio.com/download
ISE is still very much usable but VSC is the future and if you do come from a programming background then VSC will most likely be preferable.

So what can we do with Powershell? Well everything basically!

But a good place to start is with the cmdlet Get-Process.
This will show the processes running on your computer.
See detailed information here: https://docs.microsoft.com/en-us/powershell/module/microsoft.powershell.management/get-process

Powershell is case insensitive, get-process/Get-Process/GET-PROCESS etc. all work the same.

Lets add a parameter, -Name and then lets grab all processes named Chrome:

Get-Process -Name Chrome
Using Get-* cmdlets is risk free since you only get information.

Consider this scenario: You’ve been using an application, in our case the built in calculator, and the program has stopped responding and you are now unable to close it.
You open up Powershell. You know about the Get-Process cmdlet and that you can use the Parameter -Name to only get processes named ‘Calculator’.
But now what?
Along comes the mighty Stop-Process !

This cmdlet, much like its more harmless sibling, also features the parameter -Name.
But there are two ways of doing this:

Stop-Process -Name Calculator
Get-Process -Name Calculator | Stop-Process

Both will have the same outcome, the process Calculator will close.
The second alternative uses the character | called ‘pipe’ to, you guessed it, pipe the information from Get-Process to Stop-Process.
This is something that is used in Powershell all the time, expecially outside of ISE where you only work one line at a time.

When you run the Get-Process cmdlet you are returned an object, this object holds information like ProcessName or ID of the process and much more.
When you pipe the Get- cmdlet to the Stop- cmdlet, your are then redirecting that object from being displayed on your screen to being used to fill in the parameters of the Stop- cmdlet.
This means that you can’t pipe whatever you want to everything but these two are in the same ‘family’ and have been built to work togheter.

The object being pushed through the pipeline is saved in the temporary variable called ‘$_’.
We will talk more about variables in other posts but think of variables like a tool chest with labeled drawers.

That’s it for this introduction to Powershell as I’d like to keep these bite sized for beginners.
A big part of learning powershell is to just test it yourself and exploring what happens (just be a bit careful with the Stop-Process or you might have to restart the ol’ computer 😉 ).

As always, continue to learn and evolve your skills, see you in the next one!

Do you want to know more? Here is a list of tutorials to check next

Categories
Information

Hello World

Hello indeed!
In this first post I’ll try to explain my plan forward and what you can expect in the near future.

The plan is to start this blog off with a few introductionary tutorials in Powershell aimed for beginners or those who have never even touched it before.
From there we’ll most likely continue on the Powershell track, exploring different areas of this amazing tool.

Since I do not yet have a big presence online (99% of my scripts are local and customer specific), I will be working on setting up my GitHub for scripts that I feel can be useful for the community.
The same goes for 3D designs I’ve made, designs that others can benefit from will be shared (most likely on Thingiverse).
My designs are simple and often very specific to something I need (I’m an amateur with few hours in CAD software) but some are pretty decent.

You can also expect typos, grammatical errors and fun mistakes!
English is my second language and I’ll most likely write these posts without the help of any autocorrect or language spelling checks.

We can also note that my skills in Powershell and other areas we’ll discuss, are self taught. I’ll be speaking from experience and what I have learnt along the way.
Might be some terminology that is incorrect or you don’t agree with, share it with me in the comments and I’ll learn too!
I might solve a problem differently than how you would, please share your solution as well!
That’s one of the great things with scripting and developing (expecially Powershell), there can be multiple solutions to one problem!

Continue to learn and evolve your skills, see you in the next one!