$introToTutorial = “Saves time, effort and decreases hair pulling – Get your variables now!”
Variables in Powershell allows you to save stuff for later and access it when you need it again.
We’ve used variables in previous tutorials but lets take a better look at them.
A variable in Powershell starts with a dollar sign ($) and then its name, just like $introToTutorial.
To assign a value to the variable you simply add a equal sign (=) and then the value, just like we did above with the intro.
Lets write some examples:
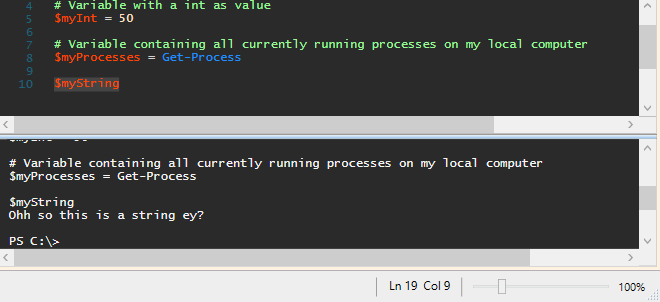
# Variable with a string as value
$myString = "Ohh so this is a string ey?"

# Variable with a int as value
$myInt = 50

# Variable containing all currently running processes on my local computer
$myProcesses = Get-Process
When we want to access the data saved in our variables we simply call their names:
We can also use it in a command like this:
$processName = "calculator"

Write-Host "Searching after process $processName..."

Get-Process -Name $processName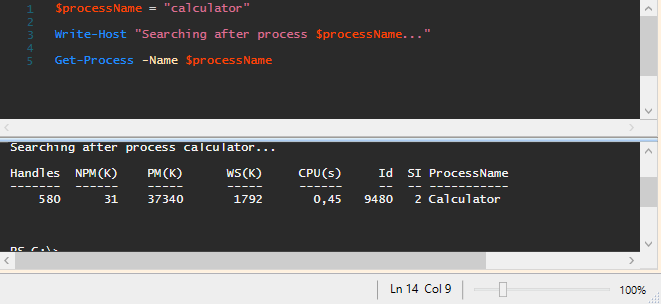
Now you might have noticed that I make certain letters of the variable names upper case, like in $myString.
I do this for the readability since the variable name often contains several words. There are many different standards of how to name and capitalize your variable names but the important thing is to chose one and stick to it.
Since Powershell is (for the most parts) case insensitive it doesn’t matter, if you name the variable $myString, you can still call it with $mystring or $MYSTRING or any combination of upper and lower case letters.
The naming of the variables can also differ between how you have been taught but I always try to name them somewhat descriptive.
$myString is fine for an example, but in something larger it just describes the type of object the variable holds.
A better example could be:
# Set the start date to yesterday
$startDate = (Get-Date).AddDays(-1)

# Set the end date to now
$endDate = Get-Date

# Location of the log files
$logFileLocation = "C:\Temp\Logs"
You can also save script blocks in variables as well as hash tables, lets look at how we set the variables and how to make use of them.
# Script block containing our custom code
$scriptBlock = {
    $date = Get-Date -Format "yyyy-MM-dd HH:mm"
    Write-Host "[$date] Im in a script block, look at me now!" -ForegroundColor Yellow
}

$scriptBlock

Write-Host "Huh ok..."

& $scriptBlock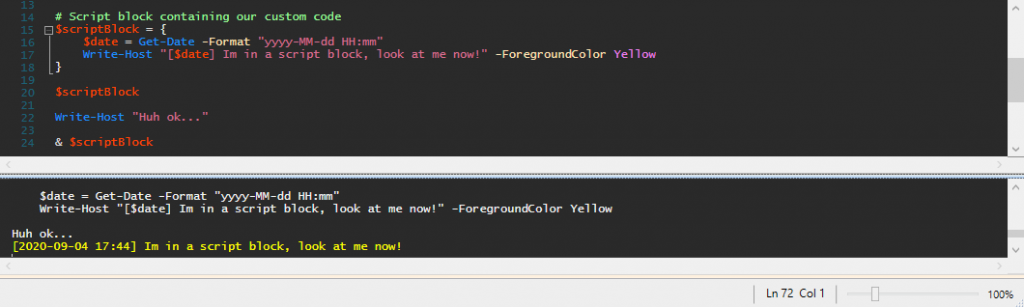
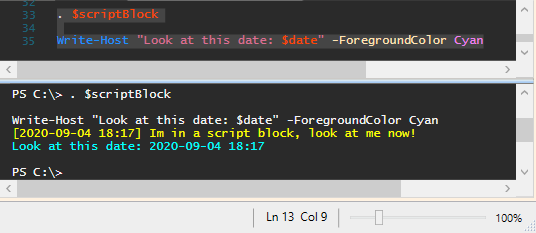
We create the script block variable by setting the value to a few lines of code, wrapped in squiggly brackets { }.
But when we call the variable by its name, like we’ve done before, it only outputs the code we want to run.
Now that can be useful if you wish to log the exact code you are about to run, but we want it to run!
That’s when Powershells call operator “&” steps in.
As you see in the above image, and when you try the code yourself, when we run “& $scriptblock” it executes the code and gives us the yellow Write-Host with the current date in the text.
We’ll be using the call operator loads of times in future tutorials but lets talk about it and it’s cousin the dot source operator so you get a grasp of them.
The call operator (&) allows you to execute a command, script or function. When you use the call operator, what ever you execute is done so in a new scope.
We have yet to talk about scopes, but Powershell scopes could be referred to as different dimensions, where variables aren’t shared.
This means that when we run “& $scriptblock” the $date variable is not available to us after, unless we have added a $date variable outside of the script block.
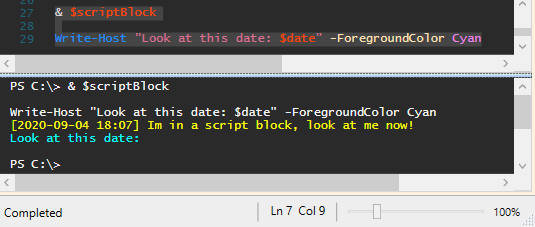
Now not sharing the variables can sometimes be exactly what we need, it can allow us to run scripts and functions without the risk of their variable names colliding with ours.
But what if we do want the variables to carry over to our script, accessible in our scope?
That is when the dot source operator (.) steps in.
Lets call our script block variable with the dot source operator instead and see if that makes a difference.
Alright, that’s awesome, but lets move on!
Hash tables and something called splatting, not as weird as it sounds.
# Hash table with colors for Write-Host
$hashTable = @{
    ForeGroundColor = "Yellow"
    BackGroundColor = "Red"
}

Write-Host -Object "Wow look at this" @hashTable
The hash table is constructed almost the same way as the script block, but with Powershell’s splat operator, the “@” sign, before the squiggly brackets.
And this time we’re not adding Powershell commands to it but rather property names and their values.
Now look closely at the Write-Host line.
Write-Host -Object "Wow look at this" @hashTableWe use both the -Object property to add the text we want to output but we also add our hash table variable, although in a different way, with @variableName instead of $variableName.
You can have all the properties in the hash table or just some and then fill in the rest when typing the command, just like we did above with Write-Host.
The use case for this is for example when you have a really long command with loads of properties or perhaps long values, or when you want to change the properties or values that should be used before executing the command, useful in more advanced scripts.
We’ll certainly use all of this again in future projects and tutorials so don’t get stressed if you don’t fully understand it yet.
The best way of learning this is by doing so try and also practice these examples and examples of your own to really get a hang of it.
This was a longer post but I have also not posted in quite a while so felt like we needed this!
Trying to keep these posts from diving too deep so they are easier to consume for someone that is new to Powershell and scripting.
If something needs to be explained better or if it’s too easy, please comment and let me know.
I am planning some more advanced posts but have tried to focus on the basics.
As always, continue to learn and evolve your skills, see you in the next one!
Do you want to know more? Here is a list of tutorials to check next