Categories
Development Powershell Tutorials

Powershell – But I only want to see this

In this post we will continue to discover basic functionality of Powershell by looking at how we can select what information we wish to display when running a Get-* cmdlet.
We will also touch on how to check what version of Powershell we are running.

Last post I talked a bit about different Powershell versions and you might wonder how you can tell what version of Powershell is running on your machine.
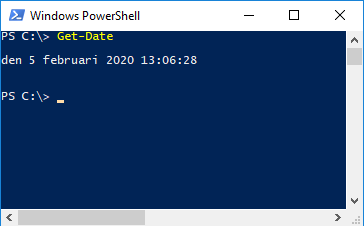
The answer can easily be found in a special Powershell variable called $PSVersionTable.

Open up Powershell (both the shell or ISE is fine) and type in the variable name and hit enter.

PSVersion is the one we are interested in.

Check this link for information on installing different versions of Powershell.

Now, if we instead move on to the main part of this post and to what we actually want to see.

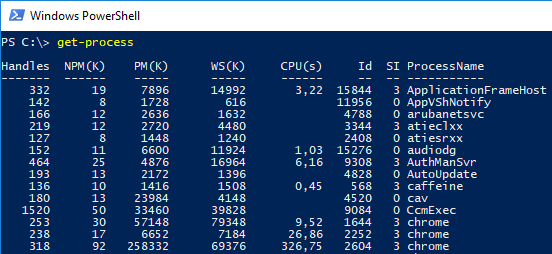
When we used Get-Process to get all processes named ‘calculator’, we were presented with a couple of attributes.

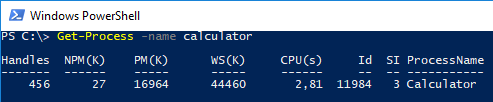
This is fine but you might feel that some of it is a bit abundant.
Again, we have a couple of different ways we can chose what to display and we’ll look at a few of them below.
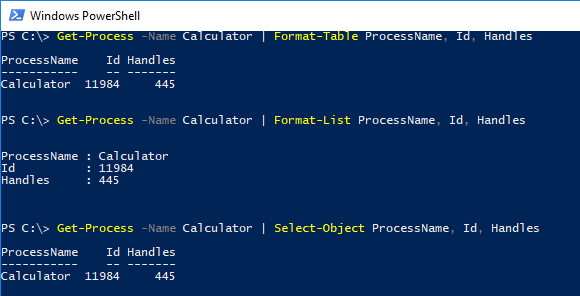
Alias = Alternative name for a Cmdlet, function or parameter. Often used to shorten how much you need to type.

Format-Table
This cmdlet formats the output in a table structure and displays only the attributes you choose.
However if you do not enter anything after Format-Table it will display all attributes available. In some cases you’ll need to enter the wildcard character * for all attributes to display (depends on the cmdlet).

This cmdlet is used a lot when you want to output a few attributes on the screen.
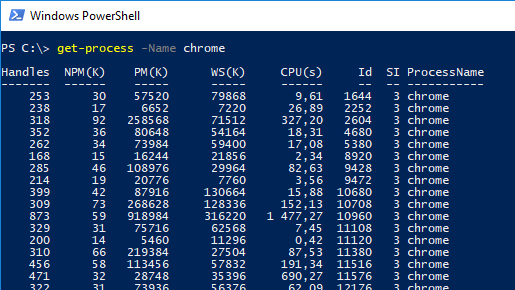
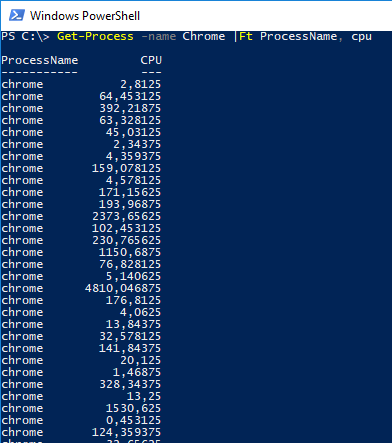
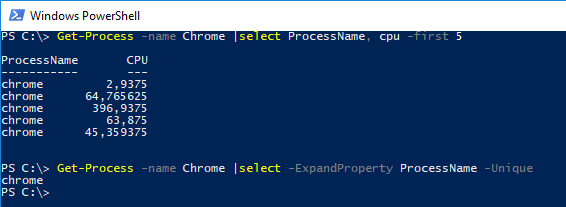
A good example for when Format-Table is perfect to use would be when you want to check all your Chrome processes and their load on CPU.

Format-Table has a very handy parameter which is called -AutoSize that auto sizes the column width.

Alias: FT (Not case sensitive)

Format-List
Works like Format-Table but displays the output in a list.
Does not have the -AutoSize parameter.

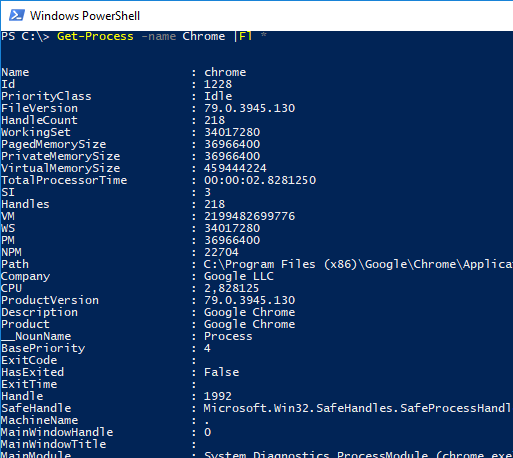
Format-List is also used a lot and comes in handy when you want to display a lot of attributes for one process.

Alias: FL (Not case sensitive)

Select-Object
Now this one is a bit different from the other two and is used more for scripting, but still useful if all you want is to display some information on your screen.

Select-Object will output in either list or table format, based on how many attributes are present.

This cmdlet will be shown many times on this blog and is also easy to play with so try to explore it on your own too!

Some common parameters and their usage:
-First 1
Displays the first object in the list, you can enter any number to display more or less.

-Last 1
Works just like -First but instead displays the last object/objects.

-ExpandProperty Name
Only accepts one property but expands it. We’ll go into more details about this feature further down the line but it basicallys opens up the property you selects. Some properties might include several values so then you’ll see it’s sub properties.
If we take the Name property as an example, when using ‘-ExpandProperty name’ it will display the name only and not the ‘header/title’ above it.

-Unique
Displays only unique values.

Alias: Select

There is more to say about all of these cmdlets and sometimes we only touch lightly on a subject, but don’t worry, we’ll be seing a lot of these in the future!

As always, continue to learn and evolve your skills, see you in the next one!

Do you want to know more? Here is a list of tutorials to check next

Categories
Development Powershell Tutorials

Powershell – Introduction

Powershell logo

“One tool to rule them all”
“Those who don’t automate are doomed to repeat themselves”

Powershell, the command line framework and scripting language from Microsoft.
In the beginning this was a Windows only feature (Windows Powershell) but has since Powershell Core and
Powershell 7 gone to open-source and is available on other platforms.
Since I am a Windows guy we’ll be focusing on Powershell from a Windows perspective.

Windows 10 comes with Windows Powershell 5 preinstalled.
Simply type Powershell into your start menu’s search bar and you’ll see two applications:
Powershell and Powershell ISE (x86 and x64)

Powershell or Powershell.exe is where you write Powershell one line at a time, much like the
Command prompt (CMD) that many has seen before.
The commands used in Powershell is called ‘cmdlets’ and are named like Verb-Noun.

Powershell ISE is the other application which ships with Windows and it has been the primary editor for Powershell scripts.
Microsoft has now stopped developing the ISE and is instead promoting the use of Visual Studio Code (VSC) with a Powershell plugin.
Visual Studio Code is free to download and use. https://code.visualstudio.com/download
ISE is still very much usable but VSC is the future and if you do come from a programming background then VSC will most likely be preferable.

So what can we do with Powershell? Well everything basically!

But a good place to start is with the cmdlet Get-Process.
This will show the processes running on your computer.
See detailed information here: https://docs.microsoft.com/en-us/powershell/module/microsoft.powershell.management/get-process

Powershell is case insensitive, get-process/Get-Process/GET-PROCESS etc. all work the same.

Lets add a parameter, -Name and then lets grab all processes named Chrome:

Get-Process -Name Chrome
Using Get-* cmdlets is risk free since you only get information.

Consider this scenario: You’ve been using an application, in our case the built in calculator, and the program has stopped responding and you are now unable to close it.
You open up Powershell. You know about the Get-Process cmdlet and that you can use the Parameter -Name to only get processes named ‘Calculator’.
But now what?
Along comes the mighty Stop-Process !

This cmdlet, much like its more harmless sibling, also features the parameter -Name.
But there are two ways of doing this:

Stop-Process -Name Calculator
Get-Process -Name Calculator | Stop-Process

Both will have the same outcome, the process Calculator will close.
The second alternative uses the character | called ‘pipe’ to, you guessed it, pipe the information from Get-Process to Stop-Process.
This is something that is used in Powershell all the time, expecially outside of ISE where you only work one line at a time.

When you run the Get-Process cmdlet you are returned an object, this object holds information like ProcessName or ID of the process and much more.
When you pipe the Get- cmdlet to the Stop- cmdlet, your are then redirecting that object from being displayed on your screen to being used to fill in the parameters of the Stop- cmdlet.
This means that you can’t pipe whatever you want to everything but these two are in the same ‘family’ and have been built to work togheter.

The object being pushed through the pipeline is saved in the temporary variable called ‘$_’.
We will talk more about variables in other posts but think of variables like a tool chest with labeled drawers.

That’s it for this introduction to Powershell as I’d like to keep these bite sized for beginners.
A big part of learning powershell is to just test it yourself and exploring what happens (just be a bit careful with the Stop-Process or you might have to restart the ol’ computer 😉 ).

As always, continue to learn and evolve your skills, see you in the next one!

Do you want to know more? Here is a list of tutorials to check next