Categories
Development Powershell Tutorials

PowerShell – What’s your type

It can be hard knowing what your type is but lets try to figure it out in this PowerShell tutorial about TYPES.

You can actually get pretty far with PowerShell without having to think much about types but it is handy to know a bit about them and how to utilize their properties and methods to improve your scripts.

Since PowerShell is very good at guessing the type we don’t always have to define it, but we can do so by prefixing the variable with the type name enclosed in square brackets.

We’ll begin with looking at some of the most common types that you most likely have already used, maybe without knowing the difference.

Integer

Integer (INT) comes in a few different sizes depending on how large a number you need stored.
A integer can only store numbers and nothing else.
When assigning a integer variable with a value, you do not use quotation marks.

# 64 bit integer
[int64]::MaxValue
9223372036854775807

[int64]::MinValue
-9223372036854775808

# Default integer which is 32 bit, [int32]
[int]::MaxValue
2147483647

[int32]::MinValue
-2147483648

# 16 bit integer
[int16]::MaxValue
32767

[int16]::MinValue
-32768

# Assigning a variable with a integer value
$myInt = 1337

String

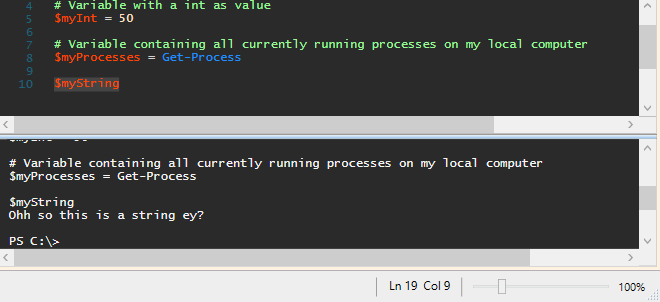
Next up is string which is text and yes the text can contain numbers πŸ˜‰

# Assign a string value to a variable
$myString = "Henlo fren, am string!!1!!1!"

# Use Read-Host to assign a string value to a variable
$name = Read-Host "Please enter your name"

Arrays of a type

We can also let PowerShell know that we want an array of a specific type, which mean a collection of something. Lets look at some examples.

[string[]]$stringsThatStings = "Bees","Wasps","Needles","TheTruth"

[int[]]$numbersForPlumbers = 85,86, 88, 88, 89, 90, 92, 95, 96, 02, 06, 07, 09, 10, 11, 12, 12, 13, 15, 16, 17, 19, 21

We still use the type definition [string] but now we also add an empty square bracket set, [string[]].
To seperate the values we use comma between them.


# These two values are different types, one is a int, the other a string
"1337" # string
1337 # int

# Addition differences between string and integer
"1337" + 3 # 13373

1337 + 3 # 1340

"1337" -as [int] # Also returns an int, but does not throw an error if the string can't be converted

Type Methods

These types also provides us with tools to work with them called methods.
We can call these methods from an object of that type or by using the type definition.
Lets jump into the examples and take a better look at this.

# String formatting
$car = "Corvette C06"
$message = "Did you see the {0} that just drove by?"
[string]::Format($message,$car)

# But I prefer this
"Did you see the $car that just drove by?"

# You can also do
"Did you see the " + $car + " that just drove by?"

# Lets use the stingy stringy again
[string[]]$stringsThatStings = "Bees","Wasps","Needles","TheTruth"

# Now we'll use the Join() method with two arguments, the first is what we want to add between the strings. 
# The second argument is our string array (stingray for short?)
[string]::Join(", ",$stringsThatStings)

# Converts the string representation of a number to an int
[int]::Parse("1337") # This returns an int

[int]::Parse("leet 1337") # This fails, the string to be parsed can only contain numbers "Input string was not in a correct format."
# As a side note, you could use regex to make sure that you only parse numbers
[int]::Parse(("leet 1337" -replace "[^0-9]","")) 
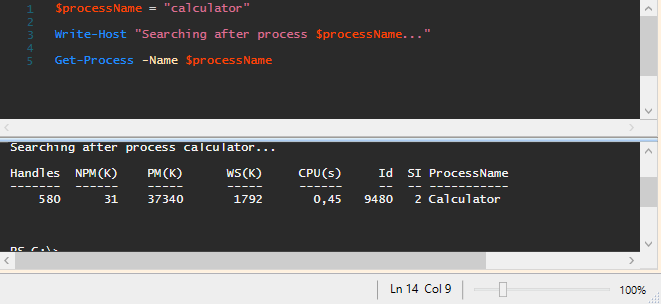
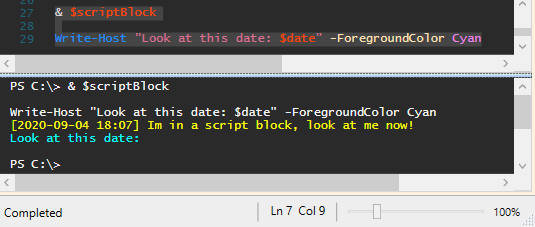
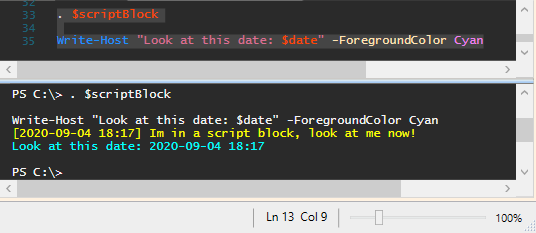
# Basically, replace everything that is NOT a number

First we have a couple of pretty self explanatory examples of building strings that contain variables.
When you add a variable in a string, the value of the variable will be displayed when the code is executed.

Next up is an example of how we can take an array of strings and merging them whilst adding something between them (called a delimiter).
In this example it just a simple comma and space, but it could be anything really, you could write something like: [string]::Join(” = sharp and can hurt a lot. “,$stringsThatStings)

Last example shows the parse method from the integer type which can convert a string representation of a integer to an actual integer.


Something I use quite a lot is checking if a string variable is empty. You might think it would be sufficient to just do If($myString -eq “”) but that will fail from time to time.
Best way I’ve found is to use if([string]::IsNullOrWhiteSpace($myString)).

# Type methods
[string[]]$ideas = "Waffle Truck made of waffles",""," ","Code that works the first time","   "

foreach($idea in $ideas){
    if([string]::IsNullOrWhiteSpace($idea)){
        Write-Host "You should think a bit more about the idea '$idea'"
    }
    else{
        Write-Host "Your idea '$idea' might just work, go for it!"
    }
}

DateTime

This type is used for, you guessed it – transporting wheat to… No wait, I meant dates and time!

Psst! Dont forget to follow along with the examples, and if you type them yourself it’ll be easier to remember!

[datetime]::DaysInMonth(2022,11) # Year, month

# Lets LEAP into some more examples
2000..2022 | foreach{ if([datetime]::DaysInMonth($_, 2) -gt 28){ "$_ was a leap year" } }

[int]$yourBirthYear = Read-Host "Enter your birth year as an int"
if([datetime]::DaysInMonth($yourBirthYear,2) -eq 29){ 
    "You were born during a leap year" 
} 
else{ 
    "You were not born during a leap year" 
}

# Lets improve it
if([datetime]::IsLeapYear($yourBirthYear)){
    "You were born during a leap year" 
} 
else{ 
    "You were not born during a leap year"
}

# Two ways of getting the current date
[datetime]::Now
# Or
Get-Date

$rubbishDateFormat = "Month10:Day5:Year2022"
[datetime]::ParseExact($rubbishDateFormat,"'Month'MM':Day'd':Year'yyyy",$null) | Get-Date -Format "yyyy-MM-dd" # We use both double qoutes (") and single qoutes (') in order to specify what is just a string, and what is the actual data 
# More about time, dates and what the formats mean: https://techmeaway.net/2021/03/21/powershell-how-to-get-a-date/

Boolean

These fellas are simple, they are either true or false.

[bool]$isPowerShellAwesome = $true

# IF our boolean is true
if($isPowerShellAwesome){
    "PowerShell is awesome, you are totally right!"
}
# Else if the boolean is false
else{
    "Sorry but you are wrong, PowerShell is awesome!"
    $isPowerShellAwesome = $true # ;)
}

Bonus

# You will encounter switches when running normal cmdlets 
Stop-Process Notepad -WhatIf 
# You do not need to add any value to a switch. If you use the switch then it use set to $true, else it is $false

# But quite often you'll encounter switches which has been implemented with $true as a default value, and if you just pass the switch again it wont remove that. 
# In order to remove a switch that has default value set to $true, pass the switch with a colon directly after followed by the static variable $false
Stop-Process Notepad -Confirm:$false 


function Write-Stuff{
    param(
        [string]$Text
        ,
        [switch]$Yell
    )
    
    if($PSBoundParameters.ContainsKey("Yell")){
        $Text = $Text.ToUpper()
    }

    Write-Host $Text
}

Write-Stuff "PowerShell rocks!" -Yell

Still loads of things to learn about types and how to best utilize them

As always, continue to learn and evolve your skills, see you in the next one!

Do you want to know more? Here is a list of tutorials to check next

Categories
Powershell Tutorials

PowerShell – Been stuck on loops FOR a WHILE

Yeah… I had to make that pun!

Ok so we are still spinning around the subject of loops in Powershell. This time as you might suspect we’re going to take a look at For and While.

Now I don’t typically use these but figured we’d talk a bit about them so that I have a legitimate reason for that pun πŸ˜‰

For loop

for ($i = 0; $i -lt 4; $i++){ 
    Start-Process Notepad
    $i
}

Above is a simple For loop that will start Notepad. Can you guess how many Notepads will be opened?

The condition (the part between the parentheses) has three parts separated by semicolons.

In the first part we specify a variable and assign a number to it, in this case 0.
Next we decide for how long the loop should run, I choose to continue looping as long as $i is less than 4.
Last part is making sure that the value of $i changes so that the loop eventually stops. I used $i++, which means that $i will increase by 1 each cycle.

Besides starting Notepad a bunch of times we also return the value of $i, returned values from the example:

While loop

$i = 0

while($i -le 4){
    Start-Process notepad

    $i
    $i++
}

In this While loop example we are again using $i with an initial value of 0, but it has to be specified outside of the While statement.
You can read the code simply as “while (this is true) {do this}”.

Instead of -lt (less than) we’re using -le (less than or equal to) and this gives us the output:

Do While

$i = 6
do{
    Start-Process notepad
    $i
    $i++
}
while($i -le 5)

Do While loop is basically a normal While loop but with the difference that a Do While will always run its code block at least once, even if the While statement is false from the start like in the above example.

Bonus round – Do Until

$i = 1
do{
    Start-Process notepad
    $i
    $i++
}
until($i -eq 5)

Very similar to the While loop but instead of doing something WHILE the statement is true, Do Until does something UNTIL the statement is true.

General information about loops

First of, loops are great, please take the effort to learn how to use them. It can save so much time and make daunting tasks quick and easy.

You can break out of loops early if you want by using the command Break. Useful for stopping a loop if the goal is achieved earlier than expected or if you encounter an error.

It is also possible to skip ahead to the next cycle without executing all or parts of the current cycle by using the command Continue.

$num = 1..5

foreach($n in $num){
    "Start of loop $n :)"
    if($n -eq 3){
        Continue
    }
    elseif($n -eq 4){
        "Woops I stopped early :S"
        Break
    }

    "End of loop $n :("
}

As mentioned in the last post about loops, you can manually break out of them by pressing CTRL + C.

If you are using Powershell 7 (not officially available in ISE), then you can use -Parallel on Foreach-Object to run the loop with several threads, allowing your loop to be even quicker!
If your stuck in ISE with PowerShell 5 you can still get multithreading in your loops but you have to do the work yourself, we might take a peak at it in a future post πŸ™‚

There is so much more that can be said, showed and explained about loops in Powershell but I try to make these posts, especially the beginner tutorials, short and interesting. It should be easy and fun learning Powershell. We can geek about the deep questions and problems when you get there πŸ˜‰

We’ll be seeing different loops, but mainly Foreach/Foreach-Object, in other posts since I use them a lot.

As always, continue to learn and evolve your skills, see you in the next one!

Do you want to know more? Here is a list of tutorials to check next

Categories
Development Powershell Tutorials

PowerShell – Stuck in the loop

Having to perform the same repetitive task over and over again is not fun and only dulls the brain. But when it has to be done, PowerShell doesn’t mind and is ready to help.

Like in many programming languages Powershell provides us with a few different loops.

ForEach-Object

Might be the most straight forward loop and one you’ll use often.
This loop is used in one liners and takes pipeline input.

ForEach-Object can be shortened down to ForEach or just simply a percent sign, %.

Examples

If you are following along, open at least one Notepad before proceeding so that you have something to collect. If you have a Notepad already opened with unsaved text in it, save it before trying these since we will be closing ALL Notepad processes.

# EXAMPLE ONE #################################################

# Foreach-Object

$notepads = Get-Process notepad
$notepads | ForEach-Object{ Stop-Process $_ }

# EXAMPLE TWO #################################################

# Foreach-Object - Multiple commands and source directly from a command

Get-Process notepad | ForEach-Object{ Write-Host "Stopping process $($_.name) with process ID: $($_.Id)" ; Stop-Process $_ }


# EXAMPLE Three ###############################################
Get-Process notepad | % { Stop-Process $_ }

In the first example we load a variable with all Notepad processes.
Next we pipe that variable to ForEach-Object and within the script block (the curly brackets) is the code we want to run for each Notepad process.
In this case we are running Stop-Process.
$_ represents the current object in the pipeline and the current item (Notepad process) being looped.

In example two we skip the initial $notepads variable and instead directly pipe the input to ForEach-Object.
This time we’re going to run two commands for each Notepad process and we will do so by using the semicolon ( ; ).
This keeps it a one liner but still allows us to use several commands like if we had several lines.
Using Write-Host we output some information to console about the processes we are stopping.

$_ has several attributes with information we might be interested in, like Name and Id which we can access by typing $_. and the attribute name (Name/Id).
Since it is within a string the .Name or .Id would be considered text, so we use a dollar sign and two parentheses, $(), to make it a temporary variable.

The third example is just to showcase using the percent sign alias for ForEach-Object.

ForEach

Sibling to ForEach-Object, ForEach is more used for scripts. Noticeable change is that ForEach does not use $_ but instead assigns a named variable.
This is my favorite loop.

Examples


# Simple Foreach loop #######################################

$notepads = Get-Process notepad

foreach($notepad in $notepads){
    Stop-Process $notepad
}


# More advanced Foreach loop ################################

$notepads = Get-Process notepad
$count = $notepads.count
$i = 1

foreach($notepad in $notepads){

    # These variables will be overwritten each loop
    $processID = $notepad.id 
    $name = $notepad.Name

    Write-Host "[$i/$count] Stopping process $name with process ID: $processID"

    Try{
        # Using "-ErrorAction Stop" makes every error a terminating error which will trigger our try catch. 
        Stop-Process $notepad -ErrorAction Stop
    }
    Catch{
        # Write a warning when we receive an error trying to stop the process. This will log some info we decide (name and pid) and then the error message returned by Powershell. 
        Write-Warning "Error when stopping process $name with process ID: $processID. Error message was: $($_.Exception.Message)"
    }

    # Increase $i by one
    $i++
}

Simple foreach loop starts with saving the Notepad processes to a variable, but this time we’re not using the pipe to pass the values to the loop.

So the code goes like “for each $notepad in $notepads”.
$notepads is our variable we created and added the process data into.
$notepad is a new variable that the foreach loop will assign a new value to each time it loops, similar to $_.
in” is just a keyword used here, gives a nice flow to it.
The $notepad variable doesn’t have to be named like that, you could name it $itSureIsNiceLearningPowerShell or whatever you like πŸ™‚

For this short example it doesn’t really make sense and you’d be better of using ForEach-Object, but lets move on the next example.

In the more advanced example we get a better taste of using the foreach loop but we start with some variables.
We get a variable containing the count of notepads, so we know how many Notepad processes we have caught.
Next up with create the $i variable and set it to 1, this will be used to tell us which Notepad process we are currently processing (like 2/7, 3/7, 4/7 and so on).

Inside the loop we create two more variables, these variables will be overwritten every time it loops.

The information we write to the console is the process name and Id, but also [$i/$count] this is useful when looping many items so that you know how far along the loop is.

The output will look like this if we had 3 Notepad processes:
[1/3]
[2/3]
[3/3]

We add some error handling to our loop with a Try Catch block.
The Stop-Process command has ErrorAction set to Stop which will make all errors “terminating errors” which will mean that Try Catch triggers on all errors.

If we encounter an error we write a warning with some useful information and add the Exception Message thrown by PowerShell, this is the red text information you get from an error.

Lastly we increase the $i variable by one.

Powershell has several more loops that we’ll discuss in the future.

And if youΒ΄re ever stuck in the loop, remember you only have to press CTRL+C πŸ˜‰

What have loops solved for you in Powershell?

As always, continue to learn and evolve your skills, see you in the next one!

Do you want to know more? Here is a list of tutorials to check next

Categories
Development Powershell Tutorials

Powershell – How to get a Date

In these pandemic times, dating can be difficult but in Powershell it’s as easy as ever!

There are numerous reasons for working with dates in Powershell, two examples could be that you might want to get the current date and time or perhaps convert a weird looking time format to another that you prefer.

Get-DateNow with extra dates

You can run the cmdlet Get-Date just like that and it’ll return the date and time with the current system formatting which on my Swedish computer looks like this: den 21 mars 2021 11:03:30

But when scripting, especially scripts that might end up running on different systems, it’s better to specify the format yourself.
This is easily done by using the -Format parameter and passing in the format of your choosing.

Formats

For me, these are some of the more common formats that I’ve used (except hh since we use a 24h clock here in Sweden).

Format
yyyy
MM
dd
ddd
dddd
HH
hh
mm
ss

Explanation
Year
Month
Day
Day first 3 letters
Day full name
Hours (24h clock)
Hours (12h clock)
Minutes
Seconds

Example
2021
03
21
Sun
Sunday
11
11
20
53

Examples

# No extra formatting
Get-Date 
den 21 mars 2021 11:29:29

# Common formatting
Get-Date -Format "yyyy-MM-dd HH:mm:ss"
2021-03-21 11:30:25

# Better suited for file names, eg. when creating log files. Parameter name shortend to f which also works
Get-Date -f "yyyy-MM-dd_HH.mm.ss"
2021-03-21_11.33.14

# Just the date, full name on both month and day
Get-Date -Format "yyyy MMMM dddd"
2021 March Sunday

# Just the time, no seconds
Get-Date -Format "HH:mm"
11:37

What else can we do? Well you might want to display a future date based on the current date, perhaps for deadlines.
This is easily done with some of the methods that come with this object type, DateTime.
We’ve yet to talk in depth about types, which we will do in a future post, but for now know that the object that is returned from Get-Date is of type DateTime.

# Add 7 days to the current date and then format it
(Get-Date).AddDays(7) | Get-Date -Format "yyyy-MM-dd HH:mm"
2021-03-28 11:51

You also have methods for AddMinutes, AddHours, AddMonths and so on that you can use the same way.
The same method is used when subtracting days, minutes etc. but you enter a negative value.

# Subtract 7 days from the current date and then format it
(Get-Date).AddDays(-7) | Get-Date -Format "yyyy-MM-dd HH:mm"
2021-03-14 11:51

You might need to convert one date format to another, if it is already a DateTime object then it’s not a problem, you just pass it to Get-Date again with the formatting of your choice.
But sometimes the date is just a string of text, maybe in such a weird and jumbled format that Get-Date wouldn’t know what to it with.
Thankfully you can tell Get-Date what the format is so that it can convert it for you.

[DateTime]::ParseExact("02-2019-15_13.37.00","MM-yyyy-dd_HH.mm.ss",$null) | Get-Date -Format "yyyy-MM-dd HH:mm:ss"

We pass in three values here:
“02-2019-15_13.37.00” – The weird date that we want to convert
“MM-yyyy-dd_HH.mm.ss” – The format of the weird date
$null – This is just empty because we do not need it, but this is CultureInfo, in case you’d want to change the CultureInfo of the DateTime object.
For example: [Globalization.CultureInfo]::CreateSpecificCulture(‘sv-SE’)

There is much more you can do with this cmdlet but this is what I would say is the basics that you need and from here I’d suggest you play around with Get-Date.


If you wish any more examples or have any issues please feel free to comment and I’ll see if I can help with it!

As always, continue to learn and evolve your skills, see you in the next one!

Do you want to know more? Here is a list of tutorials to check next

Categories
Functions Powershell

No need for excuses – Lets get logging

Hi there folks!
I want to share with you one of my favorite functions I’ve ever written: Write-Info.

Now this function is not the fanciest, nor is it the longest or the most technically advanced.
But this function has probably saved me the most amount of time and it’s just so nice to have.

Whether you are scripting changes to thousands of mailboxes, removing unused files on a network share or building a complicated Powershell tool with a graphical user interface (GUI), logging of information is important and can save your butt if a mistake is made or someone simply changes their mind…

But having to write the message to the console and then to a log file, and to add the date and keep track of errors and updating a status bar in the GUI… It gets tiresome rather quickly and you end up not doing it or just doing some of it.

This is where Write-Info steps in and saves the day!

At its current iteration, Write-Info can write to console (Write-Host), write to log file (Out-File), write to status bar and to a rich text box!
But that’s not enough, you can also choose fore color on the text for both the console and rich text box!
You can choose to write the information as three different categories Error, Warning or just the default Normal.
In the log file, date and time, computer name, username and category is added to each row providing even more information automagically.

All log files are by default added to the “$Global:CurrentSessionsLogs” variable which you can use to output the logs with for example Out-GridView to easily show the logs for the current session to the end user of your Powershell tool.
Exceptions to that can easily be made by using the switch “$ExcludeFromCurrentSessionLogs”.
If you want to use multithreading, this variable can be named $Global:sync.CurrentSessionsLogs instead and still work with Write-Info.

You can set the “$LogName” variable at the beginning of your script and Write-Info will automagically catch that and use as the log file name (exceptions can be made by giving a new log name when calling the function, eg. ‘Write-Info “hey there” -LogName “AnotherLogFile”‘).

When using the Error switch, the text forecolor is automatically set to red and the logged file is created in \Log\Errors instead of \Log\.
It also attaches $_.exception.message to the end of your error message.
With this you can add your own error message but still provide the error message provided by Powershell.

Ok that sounds great, but what if I don’t have a \Log\ directory you ask?
Write-Info creates its own file structure so that you do not have to worry about that!
On top of that it creates the directories as hidden for that extra stealth.

Lets look at some examples!

Simple Try Catch example with Write-Info using -Error
$LogName = "TechMeAwayTutorial"
 Try{
     Get-ChildItem .\FolderThatDoesNotExist -ErrorAction Stop
 }
 Catch{
     Write-Info "Failed to get the childitem!" -Error
 }
Simple Try Catch example with Write-Info using -Warning
Simple If Else statement with Write-Info, with -TextColor Green

Using the $Global:CurrentSessionLogs functionality requires that you initialize the variable at script start, I recommend that you do something along the lines of:

$Global:CurrentSessionLogs = @()
$Global:CurrentSessionLogs += "Script Started" | Select @{ n = "Date" ; e = { Get-Date -f "yyyy-MM-dd HH:mm:ss" } }, @{ n = "Category" ; e = { "NORMAL" } }, @{ n = "Text" ; e = { $_ } }

Or if you want it to support multithreading:

$Global:sync.CurrentSessionLogs = @()
$Global:sync.CurrentSessionLogs += "Script Started" | Select @{ n = "Date" ; e = { Get-Date -f "yyyy-MM-dd HH:mm:ss" } }, @{ n = "Category" ; e = { "NORMAL" } }, @{ n = "Text" ; e = { $_ } }

Now this might look a bit complicated or annoying but this function is primarily for bigger tools and can be ignored if not wanted.

Writing to a status bar or rich text box is very easy. Write-Info will look for $statusbar and if it exists, set $statusbar.Text.
Rich text box can be specified with the parameter -AlsoWriteToRTB or by setting up the variable: “$WriteInfoRichTextBoxObject”

Where can I get Write-Info?

I’ve uploaded it to my GitHub which you can find here: https://github.com/Primycha/Write-Info

I hope this gives you a good understanding of what Write-Info is and how it could help you.
I know it has helped me a lot and I hope it can help you too!

If something is left unanswered or you have any questions please feel free to comment and let me know!

Categories
Development Powershell

Multithreaded DataGridView

Welcome to a bit different post than usuall from me, don’t worry – It’s still Powershell!

I’ve been building a new generation of GUI for my Powershell tools for a while now, trying to implement all I’ve learned and make it more dynamic and easy to update.
I build all my GUIs by hand, no Powershell Studio or anything like that, just me and ISE (Still haven’t dared to go over to VSC…).
I have played around with WPF but has again returned to WinForms because of how simple it is and because I have way more experience working with it.

I will add a tutorial, hopefully in the near future, on how to create your own GUIs for your Powershell scripts, to show you that it is much easier and most people think!

OK – So the issue I had.
I’m building a “module” for the new tool, this module is a log reader and fetching the logs can take quite a while so I obviously wanted it done in the background in another thread, so that the GUI thread wouldn’t freeze during the log collection.
Problem was that when the DataSource is set on the DataGridView (DGV) the whole GUI soon froze until I had to close the process.
The update to the DGV was done in the second thread with nothing else happening in the primary thread, but still the freeze/hang happend.
The job in the second thread did not have time to finish either if I added something else to it so it was not connected to the job finishing/closing.

A lot of hair was pulled, curse words said and caffeine consumption increased before I finally found my solution!

Found this blog post with an example of how to update a DGV from another thread.
Matthew’s solution was a bit convoluted for my taste so I began testing exactly what I needed and found that it was not much at all!

I use a function called Update-DataGridView which sets the DataSource and then also autosizes all the columns.

$DataGridViewObject.datasource = $DataSource

$DataGridViewObject.Columns | Foreach-Object {$_.AutoSizeMode = [System.Windows.Forms.DataGridViewAutoSizeColumnMode]::AllCells}

The above lines was basically all the function did and how it did it before I changed it to be “multithread compliant”.

$DataGridViewObject.Invoke([Action]{
   $DataGridViewObject.datasource = $DataSource

   $columns = $DataGridViewObject.Columns
   foreach($column in $columns){
      $column.AutoSizeMode = [System.Windows.Forms.DataGridViewAutoSizeColumnMode]::AllCells
   }
})

Two things have changed; We wrap the code with .Invoke([Action]{}), and the autosizing of the columns is no longer done with a pipeline.

The .Invoke part solves our main issue but then the pipeline caused the application to hang again so we removed it.

I can’t explain, yet, why the pipeline in the second thread causes the application to hang but for now I’m just happy I found a solution!

If you can explain the pipeline problem, please share it in the comments!

As always, continue to learn and evolve your skills, see you in the next one!

Do you want to know more? Here is a list of tutorials to check next

Categories
Development Powershell Tutorials

Powershell – Variables not wearables

$introToTutorial = “Saves time, effort and decreases hair pulling – Get your variables now!”

Variables in Powershell allows you to save stuff for later and access it when you need it again.
We’ve used variables in previous tutorials but lets take a better look at them.

A variable in Powershell starts with a dollar sign ($) and then its name, just like $introToTutorial.
To assign a value to the variable you simply add a equal sign (=) and then the value, just like we did above with the intro.

Lets write some examples:

# Variable with a string as value
$myString = "Ohh so this is a string ey?"

# Variable with a int as value
$myInt = 50

# Variable containing all currently running processes on my local computer
$myProcesses = Get-Process

When we want to access the data saved in our variables we simply call their names:

We can also use it in a command like this:

$processName = "calculator"

Write-Host "Searching after process $processName..."

Get-Process -Name $processName
Powershell+You=Awesome
Output from running the above Powershell code

Now you might have noticed that I make certain letters of the variable names upper case, like in $myString.
I do this for the readability since the variable name often contains several words. There are many different standards of how to name and capitalize your variable names but the important thing is to chose one and stick to it.
Since Powershell is (for the most parts) case insensitive it doesn’t matter, if you name the variable $myString, you can still call it with $mystring or $MYSTRING or any combination of upper and lower case letters.

The naming of the variables can also differ between how you have been taught but I always try to name them somewhat descriptive.
$myString is fine for an example, but in something larger it just describes the type of object the variable holds.
A better example could be:

# Set the start date to yesterday
$startDate = (Get-Date).AddDays(-1)

# Set the end date to now
$endDate = Get-Date

# Location of the log files
$logFileLocation = "C:\Temp\Logs"

You can also save script blocks in variables as well as hash tables, lets look at how we set the variables and how to make use of them.

# Script block containing our custom code 
$scriptBlock = {
    $date = Get-Date -Format "yyyy-MM-dd HH:mm"
    Write-Host "[$date] Im in a script block, look at me now!" -ForegroundColor Yellow
}

$scriptBlock

Write-Host "Huh ok..."

& $scriptBlock

We create the script block variable by setting the value to a few lines of code, wrapped in squiggly brackets { }.
But when we call the variable by its name, like we’ve done before, it only outputs the code we want to run.
Now that can be useful if you wish to log the exact code you are about to run, but we want it to run!

That’s when Powershells call operator “&” steps in.
As you see in the above image, and when you try the code yourself, when we run “& $scriptblock” it executes the code and gives us the yellow Write-Host with the current date in the text.

We’ll be using the call operator loads of times in future tutorials but lets talk about it and it’s cousin the dot source operator so you get a grasp of them.

The call operator (&) allows you to execute a command, script or function. When you use the call operator, what ever you execute is done so in a new scope.
We have yet to talk about scopes, but Powershell scopes could be referred to as different dimensions, where variables aren’t shared.

This means that when we run “& $scriptblock” the $date variable is not available to us after, unless we have added a $date variable outside of the script block.

The reason why we see the command we just ran is because I have not saved this as a file, if we save and run it, it looks better in the console window of the ISE

Now not sharing the variables can sometimes be exactly what we need, it can allow us to run scripts and functions without the risk of their variable names colliding with ours.

But what if we do want the variables to carry over to our script, accessible in our scope?

That is when the dot source operator (.) steps in.
Lets call our script block variable with the dot source operator instead and see if that makes a difference.

Alright, that’s awesome, but lets move on!

Hash tables and something called splatting, not as weird as it sounds.

# Hash table with colors for Write-Host
$hashTable = @{
    ForeGroundColor = "Yellow"
    BackGroundColor = "Red"
}

Write-Host -Object "Wow look at this" @hashTable

The hash table is constructed almost the same way as the script block, but with Powershell’s splat operator, the “@” sign, before the squiggly brackets.
And this time we’re not adding Powershell commands to it but rather property names and their values.

Now look closely at the Write-Host line.

Write-Host -Object "Wow look at this" @hashTable

We use both the -Object property to add the text we want to output but we also add our hash table variable, although in a different way, with @variableName instead of $variableName.

You can have all the properties in the hash table or just some and then fill in the rest when typing the command, just like we did above with Write-Host.
The use case for this is for example when you have a really long command with loads of properties or perhaps long values, or when you want to change the properties or values that should be used before executing the command, useful in more advanced scripts.

We’ll certainly use all of this again in future projects and tutorials so don’t get stressed if you don’t fully understand it yet.
The best way of learning this is by doing so try and also practice these examples and examples of your own to really get a hang of it.

This was a longer post but I have also not posted in quite a while so felt like we needed this!
Trying to keep these posts from diving too deep so they are easier to consume for someone that is new to Powershell and scripting.

If something needs to be explained better or if it’s too easy, please comment and let me know.
I am planning some more advanced posts but have tried to focus on the basics.

As always, continue to learn and evolve your skills, see you in the next one!

Do you want to know more? Here is a list of tutorials to check next

Categories
Development Powershell Tutorials

Powershell – Where are we going

Media talks a lot about flattening curves so lets flatten Powershell’s learning curve by talking about the cmdlet Where-Object!

Where-Object (aliases: Where or a question mark “?”) is used to filter the data from your object based on a statement.

Lets look at an example:

Get-Service | Where-Object { $_.status -ne "Running" -and $_.StartType -eq "Automatic" }

First we get all services on the local computer, then we pipe it to the Where-Object cmdlet.
We give Where-Object a statement that will filter the output only showing services with a Status that is not “Running” and that has their StartType set to “Automatic”.

Something to note is that filtering output should be done as far left in the pipe as possible, which means as soon as possible.
The less data Powershell have to process, the less strain it puts on performance and it will also run faster.

If the cmdlet you are running has built in filters like Get-ADUser -filter then it’s probably better to use them, although sometimes those filters can’t do everything that Where-Object can.

What is -ne and -eq? They are operators; -ne = NotEqual, -eq = Equal.
If you are familiar with other languages then you might understand =/= and == which is the same, just different syntax in Powershell.
Not all operators are shortend in Powershell, -Like, -NotLike or -Contains are a few examples.
For the complete list view Microsoft’s documention about_comparison_operators

That’s it for now, be safe out there and as always, continue to learn and evolve your skills, see you in the next one!

Do you want to know more? Here is a list of tutorials to check next

Source
Categories
Development Powershell Tutorials

Powershell – Try to Catch me

In times like these when the real world is a bit crazy, it can be good to dive into something else and let the mind concentrate on learning a new skill.

So lets wash our hands and jump into a Powershell tutorial!
This time we’ll be talking about how we can easily handle errors that might occur in our scripts.
As always with Powershell, there are multitudes of different ways to do this but we’ll talk about the one I prefer, Try Catch.

Try{
    Get-Process "Wrong name of process" -ErrorAction Stop
}
Catch{
    Write-host "Oh oh error when getting process information!" -ForegroundColor Red
}

The above code is very bare bones what is needed but doesn’t really add much value.

Before we improve the example, lets talk about each block and also mention a third block that we are not using, called Finally.

The Try block comes first and within its script block (The wiggly brackets { } ) is the code that we want to catch errors from.

You’ll notice that we have added the parameter ErrorAction with value Stop to the Get-Process command.
This is because not all errors in Powershell is considered to be terminating errors, and only those kind of critical errors are caught by the Try Catch statement.
But we want all errors for Get-Process to be handled as terminating errors so we can apply our own logic and handling to them.

Script blocks will be something that you’ll come across a lot in Powershell, both when building scripts but also in one-liners.
They allow multiple lines (in a one-liner you’d separate the commands using semicolons ; ).

The Catch block is the second part of this statement and contains all the code that will be run once an error from the Try block occurs.

In the example above we only write to the console using Write-Host saying that we’ve found an error, not very useful at all!
Using Try Catch suppresses Powershell’s normal output to the console so based on our example, we wont know what error occurred since the only information we now receive is “found an error”.

We’ll add some more useful things to the Catch block later!

Try and Catch are both mandatory but there is a third part that is optional called Finally.

Try{
    Get-Process "Wrong name of process" -ErrorAction Stop
}
Catch{
    Write-host "Oh oh error when getting process information!" -ForegroundColor Red
}
Finally{
    Write-Host "Phew finally done!" -ForegroundColor Green
}

The code in the Finally block will always be run, even if the error stops the script from continuing or if you yourself have added a exit or return command to the Catch script block.

Personally I don’t use Finally that much, very rarely actually, but it can be useful if you have code that you need to run regardless of the success of the code in the Try block.

Lets improve!

# Name of the process we want to gather information about using Get-Process. Seems to be misspelled hmm..? 
$processName = "Shellpower"

# Get information about process
Try{
    $process = Get-Process $processName -ErrorAction Stop
}
# Only comments are allowed to be between the Try block and the Catch block
Catch{
    # Exception message, the actual error reported by Powershell
    $exception = $_.Exception.Message

    # Output a warning to the console about the error
    Write-Warning "Error when trying to get information about the process $processName. Error message was: $exception"    
}

So we’ve obviously added a bunch of comments and changed the process name to use a variable with the value “Shellpower” which is a name we wont be finding among our processes.

Those things aside, we now have a variable called $exception.
This variable will pull the current exception message, saved in the variable we can use it to output or save the information easily.

If we didn’t use the Try Catch block we’d receive something like this:

With our example, we instead receive this:

WARNING: Error when trying to get information about the process Shellpower. Error message was: Cannot find a process with the name “Shellpower”. Verify the process name and call the cmdlet again.

With this method you can add a more customized error message while still retaining the original error message.

You can add several commands to the Try block which can be enough if all you want to do is catch and report/log the errors.
I personally try to keep them to one command each and then add a customized error text which gives more information, since the exception messages can be a bit lacking.

Another option could be to store the information in a log file, write it to a SQL database or maybe even have the script do something when it encounters specific errors.

There are loads of possibilities with this but for the sake of keeping this bite sized we’ll stop here.

As always, continue to learn and evolve your skills, see you in the next one!

Do you want to know more? Here is a list of tutorials to check next

Categories
Powershell

Powershell 7

This is gonna be awesome!

So Powershell 7 was released a few days ago and this is probably the feature I’m most hyped about!
Foreach-Object -Parallel

I’ve not had a lot of time to try it out and to write something interesting about it but here is Microsoft’s announcement: https://devblogs.microsoft.com/powershell/announcing-powershell-7-0/

You can download it from the official GitHub repo here: https://github.com/PowerShell/PowerShell/releases/tag/v7.0.0

The throttle limit is how many threads will be run at the same time, so your computers/servers limit is based on its CPU.
Might be good having task manager up with the performance tab open. A tip is to right click on the graph on the right and select “Change graph to logical processors” to see the load on each core, this also includes Hyper threading.

What are you most hyped about in Powershell 7?

What are you planning on doing with Foreach-Object -Parallel?